I'm a big fan of Butter London. Ever since my first bottle of All Hail McQueen (before they renamed it) I have been absolutely smitten with their nail polishes. I even love their nail care products and use their "Melt Away Cuticle Eliminator" every time I sit down to paint my nails. And, while the price is a bit steep (not anywhere near Chanel prices at $14, but still requires a second gulp when compared with Essie or OPI), it is almost always worth it.
So, when I stumbled across Butter London's new Nail Skin Stickers in Black Blue Wallpaper (retail price, $10) during the Nordstrom half-yearly sale, I threw them in my cart. Though I have no experience with nail polish strips or stickers, the sort of Victorian goth vibe of the stickers convinced me that I should give it a try.
 |
| Butter London Nail Skin Stickers |
 |
| Cute sticker on the back resembles a wax seal. |
The packaging is really darling but different from some of the other nail strips that I have seen. Rather than separating each nail strip, they are arranged together on a sheet. On inspection, they are truly stickers and not at all like any of the other nail strips I have seen.
The shape of the nail sticker is odd, as one side is quite square and the other is more round. While my nail beds are more round on the second through fifth finger, the nail bed on the thumb is quite square. When I tried to apply the nail sticker with the squared end at the cuticle, I noted in doing so I would lose most of the beautiful design on the sticker once it was cut to fit.
On the other hand, if I applied the nail strip with the rounded end at the cuticle, there was more nail exposed then I would have preferred.
To avoid too much negative space on the nail, I went ahead and painted my nails with an Essie First Base base coat and two coats of OPI's Black Onyx to prep. Then I applied the stickers as instructed.
 |
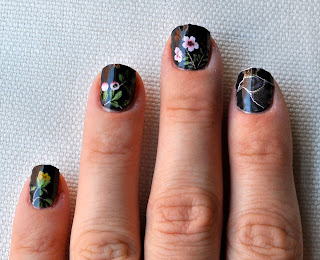
| Much less bare nail exposed with two coats of OPI's Black Onyx as a base. |
I then trimmed the end of the sticker just above the nail tip and filed with a crystal file. The file just sort of scored along the edge, so I used a small pair of scissors to remove the rest of the sticker along the scored edge. Unfortunately, after using a file, the tip of the nail looked white. It contrasted starkly with the beautiful black and looked a bit strange. So, for the rest of the nails, I simply trimmed the stickers as close to the nail as possible.
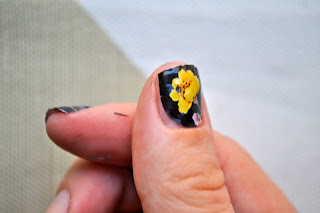
The final product was... not ideal, which was such a bummer, to be sure. The stickers were very difficult to smooth, and the sticker rippled at the end of the nail. Even after vigorous smoothing with my fingers and then with an orange stick, the rippling did not resolve. When I added a top coat, as recommend in the instructions, the polish sort of settled atop the ripples and made it look a bit worse.
I wondered whether my decision to add a base polish was the reason for the rippling problem. So, I removed the polish from my right hand and placed the stickers on a clean nail. The result was very much the same. Worse, because there was so much exposed nail around the sticker.
 |
| More exposed nail than I'd be happy to look at. |
 |
| Don't mind the black polish on my fingers, but do note the rippling on the free edge. |
I removed the stickers right away, since I was not pleased with how they applied. They were a bit of a pain to remove, as the stickers are quite sticky, which may be a testament to staying power if you can get them to work for you.
To be fair, I am new to nail strips and the learning curve may well be huge. However, I imagine that this product is quite different from the nail strips I've seen from Sally Hansen and Incoco, so I may not be the only one.
To be fair, I am new to nail strips and the learning curve may well be huge. However, I imagine that this product is quite different from the nail strips I've seen from Sally Hansen and Incoco, so I may not be the only one.
Verdict: Pass.


I've used the Sally Hansen nail strips before and was really impressed with them. I grabbed them as a bit of an impulse buy when I saw the design and packaging of the BL nail stickers.
ReplyDeleteYou're right in saying that the product is different from other nail strips. I was surprised to find out that they are literally stickers.
I encountered the exact same problems you did when applying them, though yours turned out much neater than mine did. I had to do a quick google search just to find out if I was just crap at applying the stickers or if it was the same for other people. So it looks like this time it's the product's fault.
Safe to say, I'm definitely disappointed with these.
I'm sort of relieved but ultimately still disappointed that I am not the only one. But, Butter is still new to the strip/sticker market, so maybe the product will improve over time.
ReplyDeleteThanks so much for stopping by and leaving your thoughts. You are my first comment! xx
I have tried the ones you mentioned too and was not very impressed.
ReplyDeleteHowever, then someone gave me some Jamberry nail shields and what a great experience.
I wore them in the Caribbean on the beach for 2 weeks and they were amazing. www.polishedparadise.com
also, they are non-toxic and no latex unlike te other brands.